H1 Heading Tags for SEO
When you read a book or a magazine, every chapter or article starts with a title.
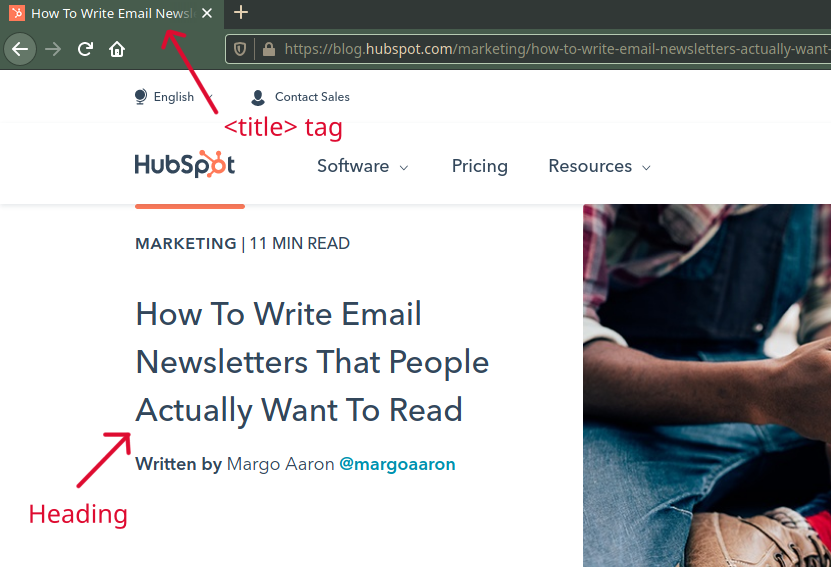
That’s true even for the web, where a title on the page is called an h1 header.
However, please don’t confuse the “title on the page” with the <title> tag! The latter is a part of the HTML code of the page that tells browsers to display a text (a title, indeed) in the top bar — a text that is often used by search engines as well to show a title in search results. The title may or may not be the same text as your h1 header.
In this post, you’ll learn about what h1 headers are, why they are important and how to create them on your site using platforms like Weebly, Wix, Squarespace, Shopify and WordPress.
If you want to skip to a specific section, below is the menu. Otherwise, just start reading!
Skip Directly to:
- What are H1 Headers?
- Why are H1 Headers important?
- How to add H1 tags in Weebly?
- How to add H1 tags in Wix?
- How to add H1 tags in WordPress?
- How to add H1 tags in Squarespace?
- How to add H1 tags in Shopify?
What Are H1 Headers?
You may have heard the words “main header” or “heading tags”.
These are also known as h1 tags, and you can recognize them because usually they appear as the largest text on your page, and can also act as the title of your page or post.
We call them “tags” because they appear as parts of the HTML language that give commands for displaying information in web pages. These elements of the HTML language are called tags and appear between angle brackets: <…>.
H1 appears in HTML code as <h1> — therefore it’s a tag.
The screenshot below shows how it looks like in the HTML code of a page:

(Note: the class=”entry-title” in this example is meant to style the h1 header in a particular way. When you look at the HTML code for an h1, it may have no ‘class’ at all, or you may come across different class names. Don’t worry about that now.)
H1 is not the only heading tag, though. There are 6 levels, from h1 to h6, that form a top-down hierarchy. The most important one is the h1 tag and the least important is the h6 tag.
Ideally, you want to have a heading structure that flows and makes sense both from a design and SEO point of view. However, nothing horrible will happen if you start with an h1 tag followed by an h4 tag, or if you have multiple h1 headings.
While this is generally considered a bad practice from a design viewpoint — as well as making it harder for screen readers used by visually impaired people, so you may want to avoid it for their sake — your final goal is “making sure the content is organized in a practical and sensible manner”, as stated in this Search Engine Journal article.
That means that a correct heading structure is always preferable, but when in doubt you should aim for user experience and a coherent content organization.
Now, for an example of “correct structure”, you can think about how chapters and subchapters in a nonfiction book are organized, or you can take a look at the following taxonomy to get an idea of the relative importance and semantic hierarchy of tags:
- Organism would be like <h1>
- Animal would be <h2>
- Mammal would be <h3>
- Carnivore would be <h4>
- Dog would be <h5>
- Beagles would be <h6>
You start with the broad, and you end up with the more specific.
Why Are H1 Header Tags Important?
It’s simple: h1 headers matter because they are one of the things search engines like Google or Bing scan in order to understand what your site is about.
In fact, the “h1” describes the topic of the post or page, and together with other headers, it indicates the structure of the page or post.
Also, h1 header tags are important for the actual visitor of your page, who will see the header as a clear indicator of what the page content is about.
What Does the Task Look Like in marketgoo?
In marketgoo, this task falls within the Optimize section.
Once you choose the keywords you want to focus on, you will optimize each page and post on your website for those keywords. In marketgoo, if your h1 header is not optimized, you will get a recommendation to have it include one or more of your focus keywords.
See the screenshot below:
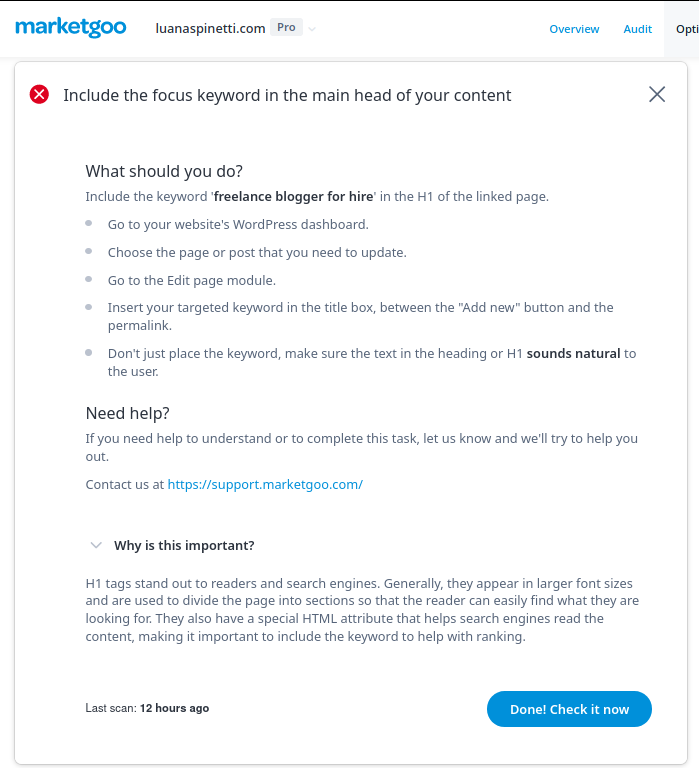
As you can see, marketgoo can detect your missing titles, h1 tags and tells you how to insert them in your site. To find this recommendation, go to Optimize -> Pages to optimize -> click on a page -> read marketgoo’s recommendations for it.
“How do I insert keywords in h1 tags?”
Depending on what platform you are using, the instructions will vary.
H1 Tags in Weebly
Weebly is famous for its easy, drag-and-drop style, perfect for those who don’t want to get stuck in the technical details of building and optimizing their websites.
So it’s easy to drag and drop a “Title” element into one of your pages in your website builder, but as it turns out, this will create an <h2> header, not an <h1>.
(Note: you can vote on this community post to request a native h1 feature!)
If you recall the header hierarchy, you’ll know that having an h1 is important.
Currently, there are 2 workarounds for this:
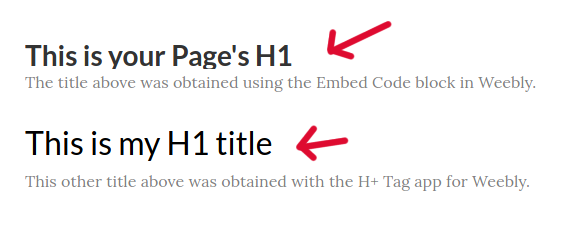
- The easiest way is to add the free H+ app from the Weebly App Center to your Apps, and then drag it into your post or page wherever you want your h1 or other headers to go. They have different font, color and size options.
- The second way involves dragging the “Embed Code” element into your page, and insert the following HTML code:
<h1 style="text-align:left;color:#028c6a;font-size:28px;"> This is your Page's H1</h1>
As you can see, this code specifies the alignment of the text, the size, and the color. These are all things you can change.
Use Color-Hex.com to choose a color and copy its hexadecimal code (the one starting with #).
Where it says “This is Your Page’s H1”, you can replace that text with your own.
As you can see in the screenshot below, we experimented with both workarounds (the Embed Code element and the H+ App) and this was the result:
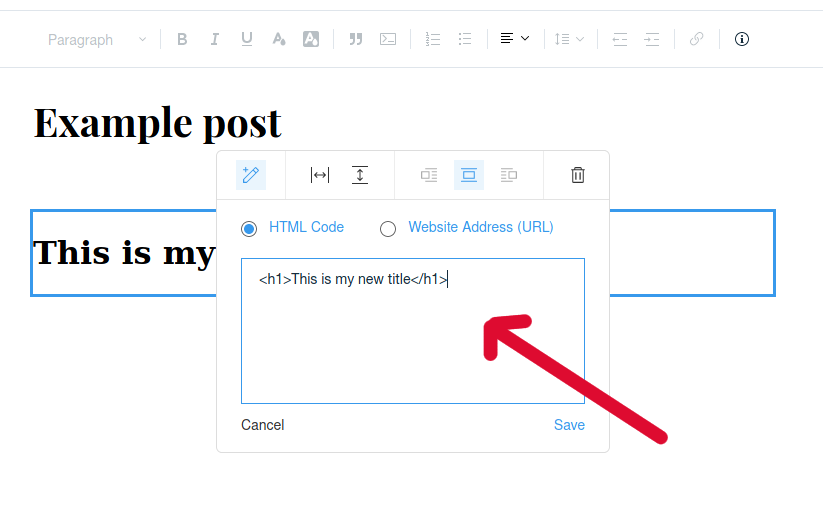
H1 Tags in Wix
There are two ways to create an h1 header in Wix.
If you’re working on your blog:
- Click Add on the left side panel
- Click HTML Code at the end of the list of options
- Write <h1>This is my new title</h1> in the HTML field that appears, changing the text within the <h1> … </h1> tags with your own title
- Click Save
See the screenshot below:
If you want to edit your h1 header, just click on it and the HTML field will appear again.
To add an h1 header to your site pages, go to your Dashboard and click Site actions -> Edit Site from the middle panel.
When you’re in the Wix Website Editor:
- Choose your page from Pages on the left side toolbar or create a new one
- Click Add on the left side
- Click Text -> Themed Text -> Add Heading 1
- Click Edit Text
- Edit the text to include your title. You can also adjust its size and font
- Drag and drop your new title to your preferred position on the page
To edit this h1, click on it and then on the Edit Text button that appears above your title.
You can find more information and screenshots in this Wix support page.
H1 Tags in WordPress
WordPress makes things very easy when it comes to formatting titles and paragraphs in a page or post.
In fact, you can add and edit all your headings right in the post editor.
Now, there’s a difference in how you do that depending if you use WordPress’ Classic Editor or the Gutenberg Editor.
For the Classic Editor, all you have to do is open the drop-down menu on the Paragraph item on the menu bar and choose “Heading 1” among the heading options.
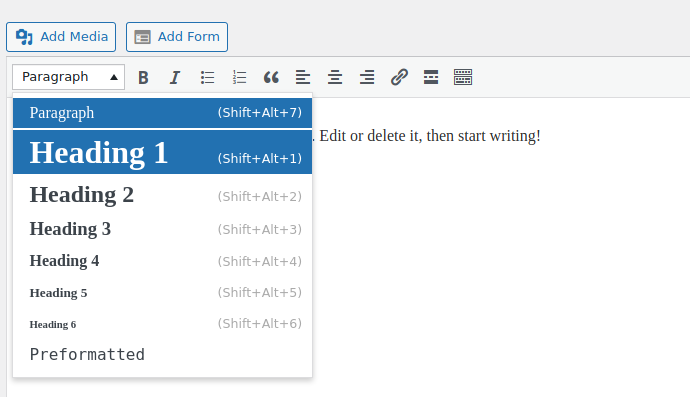
If you have yet to write the title, click on “Heading 1” and then write your title. If you have already written the title, select it with your mouse and then choose “Heading 1” from the menu.
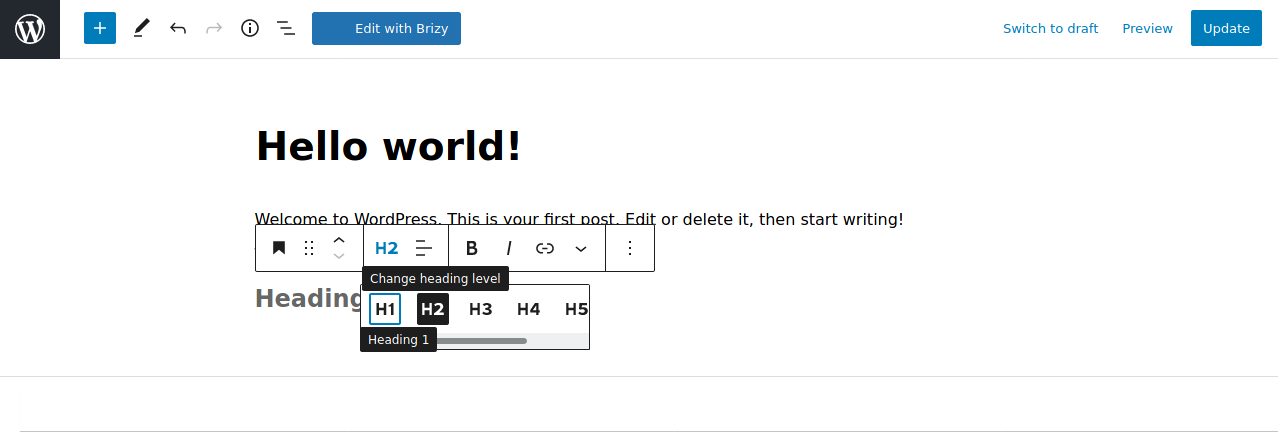
If you use the Gutenberg Editor, you have to click the blue “+” button at the top left of your post/page editor to open the block inserter. In the window that opens, click “Heading” and then click on the “Heading” text that appears on your post/page.
This heading is generally an h2 and you can see this because, after you clicked on the “Heading” text, an options bar appears and says “H2”.
All you have to do now is click on that “H2” in the options bar and then select “H1” from the heading options that you are shown. See the screenshot below:
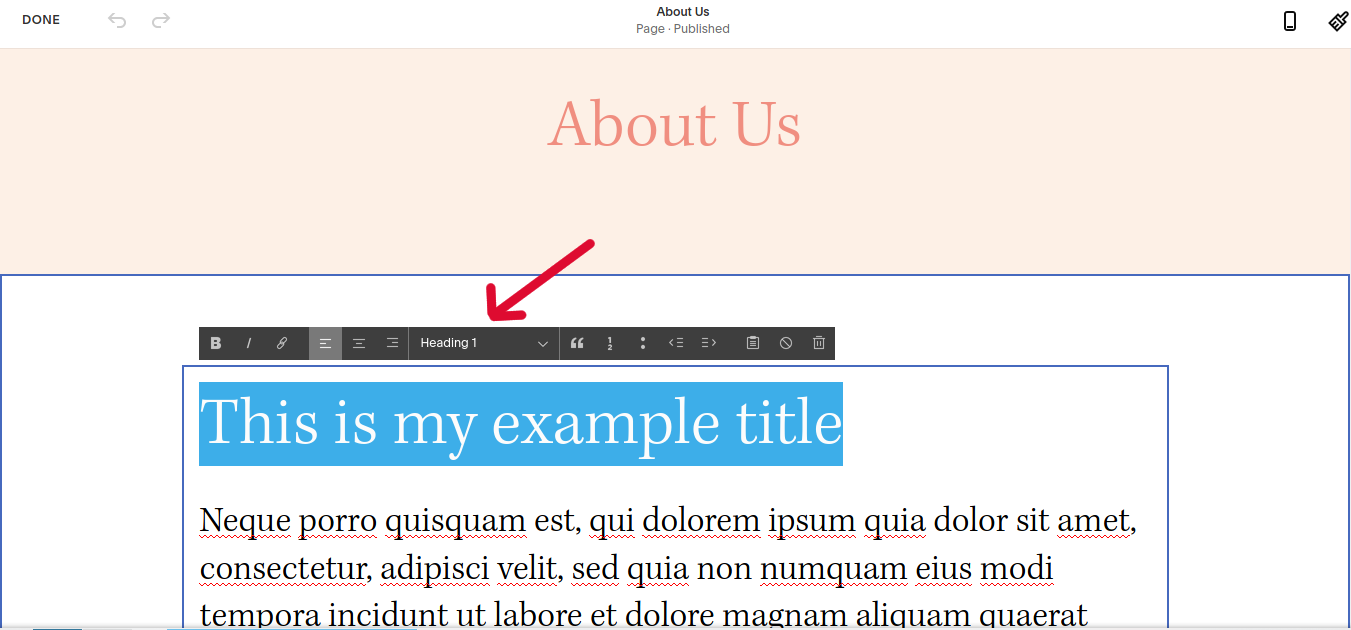
H1 Tags in Squarespace
Creating h1 headings on Squarespace is pretty simple:
- Choose your page under Main Navigation
- Click the Edit button at the top
- Write your heading text in the body of the page (or select it if you’ve already written it)
- Choose “Heading 1” from the drop-down menu
See the screenshot below:
Certain templates on Squarespace add h1 tags to your pages and posts automatically, and due to this your site can have more than one of the same tags. This is simply because of the way those templates are set up.
However, this is no problem at all! In fact, Squarespace has said that while multiple h1 tags make some users nervous, they should rest assured that it will not have a negative effect on SEO if they are correctly used (that is, to highlight different sections on a Page or Post).
H1 Tags in Shopify
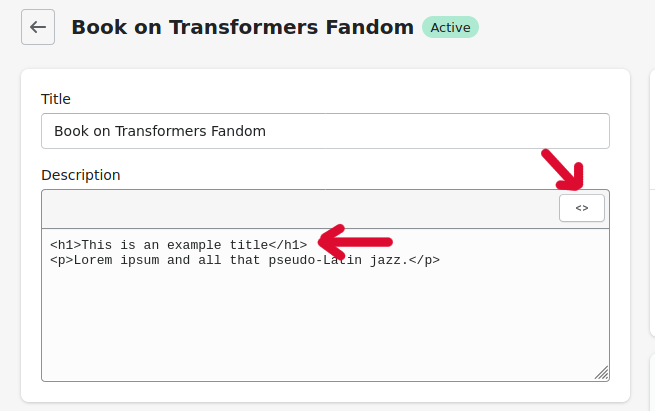
When you add a new product in Products -> Add product, you can add an h1 heading to your product description by clicking the “<>” button on right side of the description box and writing the HTML code for the h1 heading:
<h1>This is an example title</h1>
See the screenshot below for an example:
It’s also worth noting that your product Title will automatically convert to an h1, so you’d follow these instructions if you wanted to add an additional h1.
Please keep in mind that any further h1 headings in your shop’s theme can only be edited through the theme editor (Online Store -> Themes -> Customize) and you can’t add headings to the theme manually.
H1 Tags and SEO: Best Practices
1. Don’t stuff your heading tag with keywords
Google hates that, and it doesn’t help readers either.
Incorporate keywords naturally in your heading just the same way you do with your post or page text.
Try to not use more than one h1 tag on a page, but as we said, having more h1s doesn’t put you in trouble with Google, so don’t worry if you can’t help it, as in the case of certain templates, where this is beyond your control.
Just make sure your headings work as titles and dividers to different sections and not just randomly interspersed within your page or post.
2. Don’t make <h1> the same as your page title
Unless it makes sense to repeat your <title> tag in your h1 heading (for example, when you want to have your blog post title in both the <title> and the heading), try to not make it the same as your page title, aiming to vary the use of your focus keywords and to better inform the reader about your content.
A good rule of thumb is to make your h1 header text consistent with that of the <title> but not identical.
3. Always have an <h1> tag on your page
If the <h1> tag is missing on your page, search engines can and will use any available heading they find on your page, which means they will take the h2, h3, h4 , h5 or h6 tags as the page’s title (and therefore as the title that’s representative of the whole page’s content).
Make sure you have at least one h1 header on your page and that this gives users information about your content.
Want to see what you need to do to optimize your h1 headers? Login to marketgoo now!